Forum Krótkofalarskie PKI

FT-450
T#41685 modyfikacja podswietlania skali w FT-450 (usuwanie
Facebook
sq6ilc
poziom 4

Użytkownik
QTH: KOTLINA
UŻYTKOWNIK ZABLOKOWANY

Ilość edycji wpisu: 1
#263177 17.05.2009 18:08:57
modyfikacja podswietlania skali w FT-450 (usuwanie brumu na nosniej przy zmianie poziomu oswietlenia) prosze o info
wpis edytowany 17.05.2009 18:11:44


www.sq6ilc.pl
SP7UDB
poziom najwyższy i najjaśniejszy :-)

Administrator 
QTH: Kielce - KO00HU
#263179 17.05.2009 18:13:10
Ale napisz konkretnie o co ci chodzi. Wykonałeś taką modyfikację i chcesz się pochwalić czy szukasz?
Bo jak dla mnie jest to niejasne.


- Mariusz - Kielce -
Temperatura za oknem
sq6ilc
poziom 4

Użytkownik
QTH: KOTLINA
UŻYTKOWNIK ZABLOKOWANY
#263180 17.05.2009 18:37:07
szukam info jak to zrobic


www.sq6ilc.pl
SP7UDB
poziom najwyższy i najjaśniejszy :-)

Administrator 
QTH: Kielce - KO00HU
#263260 17.05.2009 22:42:28
Aha rozumiem, myślałem, że może zrobiłeś taką modyfikację. Ja niestety nie pomogę, ponieważ nie posiadam takiego radia.


- Mariusz - Kielce -
Temperatura za oknem
SQ9MCS
poziom 5

Użytkownik
QTH: Kraków - KO00AC
#263261 17.05.2009 22:44:26
Miłego tłumaczenia:

When using the Display Dimmer for a lower illumination of the Display, some of the radios have a hum on the transmit signal (all modes) when the Dimmer is set below level 4.
How to proceed:

Remove all of the bigger screws on top case and bottom case, the 4 small one on top are for the speaker, leave them untouched, but take care of the speaker cable.

When case is removed, put the radio on the edge of your work bench and let the front panel assy look over the edge. then lift the 2 plastic ears of the front panel assy up with your fingernails and tilt the front panel some degrees towards yourself..

Carefully turn the radio upside down (2 ears on top must keep their position) and do the same with the lower ears. then the front panel will come off the radio. don't let it fall down, the flat cable on the back side can not hold the panel and will be damaged.

Turn the front panel to see the back side, the pictures show the panel with the upper side up, you can compare with yours to check the right position.
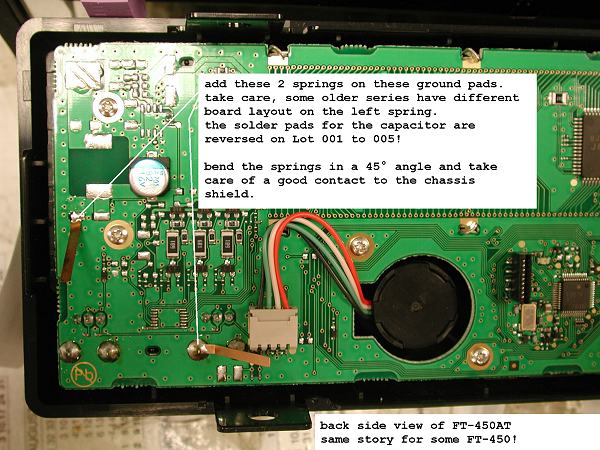
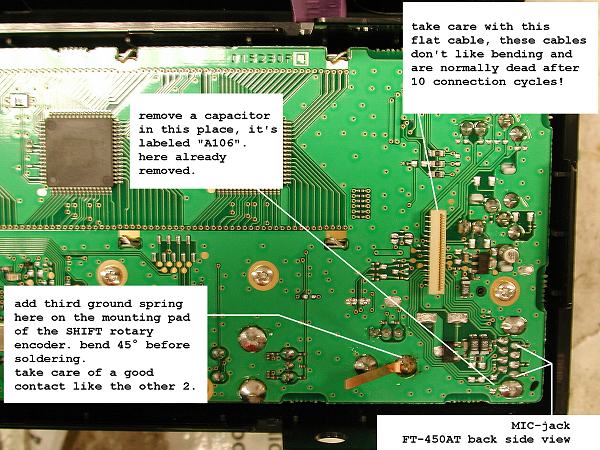

On the right lower side behind the mic jack there is a capacitor to be removed, A106 is the label.
Left to this position one of the springs with p/n R0154650 is to be soldered. bend the spring 45 degrees upward, about 2mm away from the edge.
The 2mm will be in the solder, the rest will be the arm for ground contact on the shield plate on the main chassis.

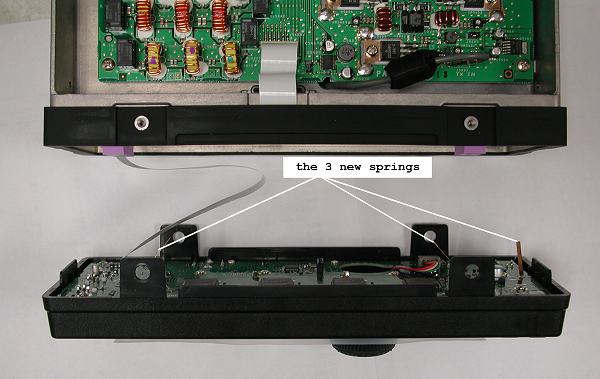
On the left side of the panel 2 springs have to be mounted in same manner, but take care of the different board layouts in the series. The solder pads exist, but the capacitors are not mounted. one of the capacitors is reversed. do NOT solder the spring on the plus contact, this will damage your radio!

After the springs are soldered check their angle before attaching the front panel back to the main cassis. take care of the flat cable and don't forget to plug it in!

Reassemble the case and have fun with your radio....
sq6ilc
poziom 4

Użytkownik
QTH: KOTLINA
UŻYTKOWNIK ZABLOKOWANY
#263370 18.05.2009 12:02:06
Podziękowł
73 Krzysztof


www.sq6ilc.pl
sp9wul
poziom 3

Użytkownik
QTH: Andrzej, Kokotów KO00AA
#263372 18.05.2009 12:13:20
Hmmm.... ale jest jeszcze jeden prostszy sposób na pozbycie się brumu, zalecana zresztą przez Yaesu
Należy wejść do menu, odszukać ustawienie jasności wyświetlacza, nastepnie nalezy ustawić na minimum i ponownie dać na maxa - powinno pomóc. Zalecają również aby nie występował rzeczony brum nie ustawiać na pośrednie wartości jasności podświetlenia ponieważ wtedy on się aktywizuje.
Miałem FT-450 i po takiej operacji pomogło.


Pozdrawiam
Andrzej SP9WUL
Aby pisać na forum musisz się zalogować !!!
rss · kontakt · załóż własne forum · korzystasz z forum? wesprzyj projekt!